




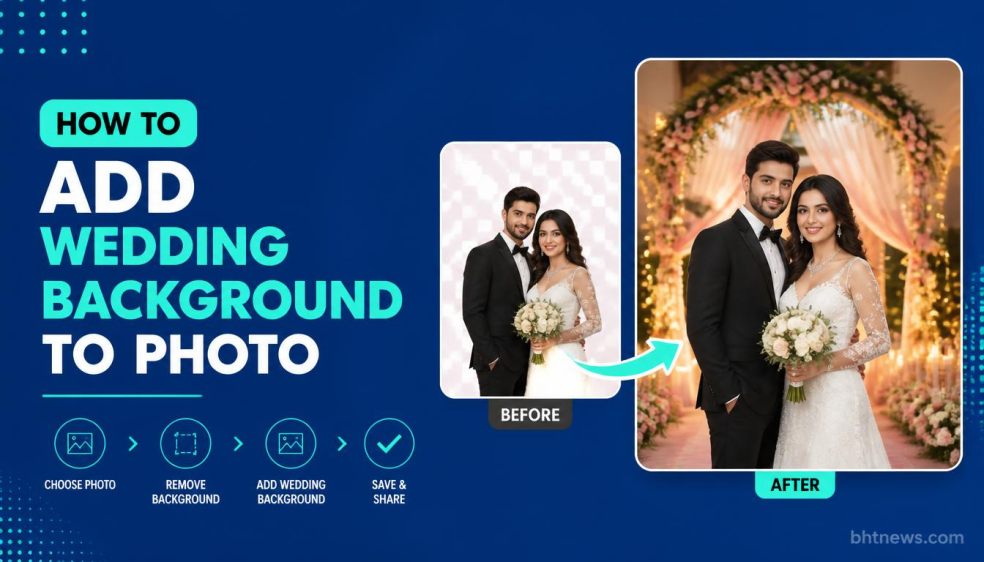
How to Add Wedding Background to Photo: The Simple AI Guide
Maybe your favorite engagement photo has a concrete wall in the background, or your only wedding portraits are from a courthouse hallway. The expressions are perfect, but the setting? Not so much.
The good news is, you can give that photo the backdrop you always wanted in just a few minutes. No Photoshop skills needed—just a little patience and the right free AI tool.
Here’s how to take any photo and add wedding background to photo without making it look fake.
What Does “Adding a Wedding Background” Actually Mean?
The whole point is to swap out the background behind you for one that looks, well, more wedding-like. AI tools do the heavy lifting: they cut out the people from the rest of the photo and place them somewhere new.
That new backdrop could be a digital scene you describe with words, a template, or even a real venue photo you upload yourself.
Why do this? People use background swaps for all sorts of keepsakes:
- Turning engagement pics into wedding invitations or save-the-dates
- Dropping a courthouse photo into a dreamy garden or elegant ballroom for grandma’s album
- Upgrading a casual snapshot into something polished for a thank-you card
- Making a set of different photos feel like one coordinated collection
Honesty time: Swapping backgrounds is creative editing—it's not a record of what actually happened.
That’s fine for sharing or making a card, just don’t use it for anything official. You might want to tell relatives you worked a little digital magic, especially if they’re likely to think it’s the real deal.
How to Add a Wedding Background: Step-by-Step
It doesn’t matter which online tool you pick—these five steps will cover the basics.
1. Upload a Good, Clear Photo
Start with the best version you have. Make sure the faces are sharp, the edges of hair and outfits aren’t blocked by furniture, and the lighting is even. The less clutter you have behind you in the original, the better the cutout will be. Don’t grab a blurry screenshot off your phone; go for the highest-resolution pic available. Check the file rules for your editor—for example, Adobe Express takes JPEG, JPG, PNG, and WebP files up to 40MB.
2. Let the AI Remove the Old Background
Tools like Picsart and Adobe Express will zap the original background with one click and leave just you (or you and your partner) on a transparent layer. Take a moment to zoom in and look closely around edges—lace, veils, and stray hair are always tricky for AI and may need some fixing later.
3. Pick or Create Your Dream Venue
Now, you get to choose where you land. Either:
- Type a scene description into the AI—something like “soft sunlight streaming into a glass conservatory with white roses” or “candlelit stone chapel interior.”
- Select from pre-made templates or upload a photo of a real place you like.
Real venue photos tend to look most natural, because the light and perspective actually line up. Some editors like CapCut will add a wedding background in one step: just upload and go. They claim your faces, poses, and expressions stay unchanged—try it and see how it stacks up against your original.
4. Touch Up the Details—Veil, Hair, and Dress Edges
This is where most people notice something’s off: AI doesn’t always handle tulle, lace, or loose hair very well. Scan around those areas. If there’s a weird glowing edge or a chunk of veil missing, use the refine or restore tools to smooth things out. Drop the cutout edge by a pixel or two for halos, or paint missing hair back in with a brush. Some tools don’t offer these fixes, so you might have to rerun the cutout with a better source photo or try a different editor.
5. Match the Lighting and Download
Now you make everything click. Tweak brightness, contrast, and color temperature on the people to match the new background. Adding a soft shadow under your feet or a hint of blur to the new scene can help blend things together. Once it looks convincing, export it as a PNG if you want to edit more, or as a high-quality JPEG for sharing or printing. Always keep your original, just in case you want to try a different venue later.
Three Free Tools You Can Try
Before you get started, double-check what’s free, what’s not, and if there are any watermarks or size limits.
- CapCut: Lets you place a photo in a wedding scene in one click. You’ll need to create an account. No clear details on file types or download quality, but the process is simple.
- Picsart: Background changer removes backgrounds, lets you choose from templates or upload your own, and can create AI backgrounds from text prompts. You can download as a transparent PNG.
- Adobe Express: Free background changer, no credit card needed. Pick backgrounds from their library or create one with a prompt, then download as a PNG.
If you want something quick, CapCut is the fastest. If you want to fine-tune the background, try Picsart or Adobe Express.
Tips for a Realistic Wedding Background Swap
- Match the lighting. Don’t stick a photo taken in harsh sunlight into a dimly lit ballroom scene.
- Watch the perspective. Camera angle matters—make sure the floor lines and horizon look right.
- Dress for the scene. A cathedral backdrop doesn’t work if you’re in jeans and a T-shirt.
- Check the size. Arches, aisles, and people should all look proportional.
- Adjust colors. Warm candlelight? Warmer skin tones. Cool daylight? Cooler adjustments.
Personal note: The first time I tried this, my couple looked great at first, but the midday shadows on their faces didn’t fit the new soft-lit garden background at all. A quick change to “overcast garden, soft diffused light” in the prompt plus a slight warmth tweak made a huge difference.
A Few Last Reminders
- Always get permission from everyone in the photo before editing and sharing.
- Never use edited images for anything official.
- Read each tool’s privacy and usage rules.
- Keep the original photo in case you want to try again.
Give It a Try
You don’t need a design degree or expensive software—just a clear photo and about 10 minutes.
Let AI do the background swap, fix up the edges, match the lighting, and see how it looks. If something doesn’t seem right, it’s probably a lighting or edge problem.
Adjust, save your favorite, and you’ve got a brand-new wedding portrait, ready for your album, a card, or sharing online. Enjoy!
Frequently Asked Questions
Is there any way to add a wedding background to a picture for free?
Usually, yes. According to Adobe Express, its background changer is free and does not require a credit card, and Picsart and CapCut also offer free plans. Limitations, watermarks, and export quality depend on the current plan offered by each program.
Will my faces and clothes be saved as is?
Cutout-based tools preserve your original pixels and replace only the background. Image generators tend to edit more parts of the picture. The page of CapCut states that faces and poses can remain untouched, but always compare the edited version with the original one.
Why does my veil become white?
Veils are partially transparent, and AI cutouts usually consider them opaque. Try to use a source photo with a veil against a dark and uniform background, reduce the opacity of the veil area, and match the color of the background.
What file should I upload and export?
Upload the highest quality JPEG or PNG you have. Adobe Express supports JPEG, JPG, PNG, and WebP files up to 40 MB. Export a PNG for further editing and a JPEG for posting. When printing the picture, export it at the largest size available and ask your printer about their recommended resolution.